

|
 |
|
|
|

|
The
Standard Three Light Set-up
The first light to be positioned should be your modelling light.
This will become your key light. As this is the most important light
it should be positioned carefully, and this will depend on the scene
requirement. Question where the light is supposed to be coming from,
and what its source is supposed to be - a window or overhead light?
Then decide how much you need to model the features of the subject
- the cheekbone, eyebrow, nose, and chin shadows. This should be
in sympathy with the subject as well as the story content.
In a standard set-up the modelling light may be used to simulate
light coming from a window, so position this light out of shot,
forward of the subject and at window height. When the desired modelling
effect has been achieved, the soft fill-light can then be added.
This should be placed nearer the lens axis on the opposite side
to the modelling light in order to soft light the shadowed areas
created by the modelling light. Avoid creating further shadows by
over-powering the modelling light effect. When using the spot-to-flood
facility of the Paglight in combination with the soft light filter
you will achieve the fine control required to balance the effect
of these two lighting requirements.
Finally, add the rim or backlight. This can be positioned behind
the subject, on the darker side, and high enough to rim light the
top of the head and shoulders. If required, spill light from this
light may be used to light the background. Note that in order to
eliminate lens flare, any light falling on the camera lens surfaces,
regardless of whether it is out of the framed shot, must be flagged
off with either the lamp's own barn door system or a French flag.
|
|
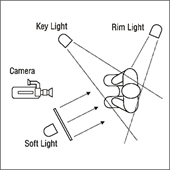
Fig.8 The three light set-up from left.
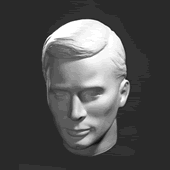
Fig.9 Modelling and fill light from
right.
Fig.10 Modelling light from right and
rim light from left.
|

|
Artificial
Light Only
Using artificial light only, for
instance in a studio or room with no windows, is an ideal situation
because everything is under your control. In this set-up the camera
can be balanced for artificial light and your Paglight can be used
with its tungsten-halogen lamp unit without the need for a colour
correction filter.
The nominal colour temperature of tungsten halogen studio lighting
is 3200°K. The above situation, using the Paglight PowerArc,
which produces a daylight colour temperature of 5600°K, would
require the orange PowerArc conversion filter,
(Model 9973) to reduce its colour temperature in order to match
the artificial lighting.
|
|
|
|
|
|
