
The aim of this article is to introduce you to the versatility of your new Paglight whilst exposing the secrets of good lighting in such a way that you can continue to build on your skills and enjoy the situations and challenges that beset all cameramen.
PAG respects the fact that a news cameraman will never have the time or luxury of a full production lighting team. The Paglight has been specifically designed as a single-operator all embracing camera light, giving you the ability to achieve professional results when presented with the most demanding of lighting situations.
Good lighting is an art, yet the basic principles
are simple.
If you would like to be recognised for the work you produce as a camera
operator, it is essential to understand how to control light and achieve
a good result with limited resources.

Fig.1 The Paglight range of lights.
The most standard of all lighting set-ups is affectionately known as the 'three light set-up', and this forms the basis from which all other more complex set-ups are derived. In this article I am going to define the following set-ups, using, of course, the extremely versatile professional Paglight range of lights:
- The lighting qualities
required for the production
of a natural look in a contrived environment,
and the names applied to them.
- The ideal positioning for
the lights.
- The art of using a mix of
artificial light
and daylight.
- How to make a quick lighting
set-up decision.
- Exploring the best gadgets
to keep in the
production kit bag
- Definitions of common terms
used in lighting.
Light, uninhibited by clouds or filters, travels in straight lines; objects in its path cast sharp shadows. The relief or contours of objects may be exaggerated with dramatic effect. By moving the point source of the light, or the object itself within the path of the light, you can control the shadow effect. This is called modelling and the light creating this effect is referred to as the modelling light. Alternatively, when modelling becomes the main objective of the lighting set-up around which all other lights are then secondary, it may be referred to as the Key Light.
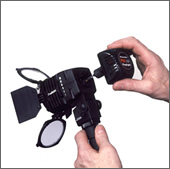
Your Paglight is excellent when used away from the
camera as a modelling light, because it gives you the ability to choose
between the PowerArc and a wide range of halogen quick-change plug-in
lampholder units. These units can be swapped in seconds, regardless of
the lamp being hot or cold.
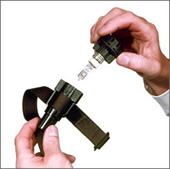
Of course, I must add that great care should be taken when removing a
hot lamp and it should be immediately placed into its heat-resistant lamp
protector to cool. The Paglight has a full range focusing assembly, giving
you the ability to control the beam angle and therefore the intensity
of the light and modelling effect.
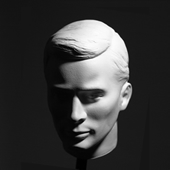
Fig.2 Modelling light
Soft Light
Light that passes through cloud or diffusion
filters, or is bounced off opaque surfaces, loses its directional properties
and becomes soft light. This light can be used to soften the harshness
of direct light shadows, or modelling light shadows, whilst also increasing
the ambient light level around or falling on the subject. When working
outdoors an opaque reflector board is often used for this purpose, provided
there is adequate available light. This aspect of lighting is also referred
to as fill lighting.
Your Paglight, when used either on or off the camera, is ideally suited
for situations that require a soft fill light, and this is achieved by
using the flip-in diffuser, supplied as part of the Rotatable Accessory
Kit (Model 9959). For super-soft lighting effects you can add PAG's Softlight
Diffuser screen assembly (Model 9983) to the barndoors. The Paglight's
spot and flood control used with the soft light filters gives further
control over the soft light intensity.

Fig.4 Soft, reflected fill lighting
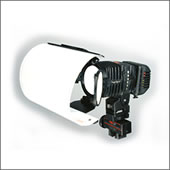
Fig.5 Paglight with Softlight Diffuser Kit
Direct unfiltered light can be used to silhouette an object or person from behind. This light is usually positioned slightly high and outside the scene in such a way as to light the edge or rim of the subject. This will give the intriguing effect of light coming from a window somewhere out of shot, and this extends the viewer's imagination beyond the limits of the framed image. This effect is often used in portrait photo-graphy to outline the subject from the background, where the two would otherwise merge.
Great care must be taken not to overdo rim lighting, as it
can be very distracting. You may have noticed this in some portrait photographs where strands of hair, picked up by the rim light, glow brilliantly against the background and look strangely unnatural. Rim lighting requires careful control, and for this reason you will find that using a Paglight is ideal. First choose the appropriate plug-in halogen lampholder or the PowerArc unit, and then use the spot-to-flood beam angle to control the spread of backlight. Finally, by adjusting the barndoors to flag off any direct spill light from flaring into the camera lens, you will achieve the desired backlight effect.
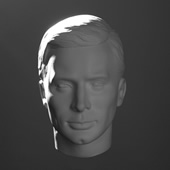
Fig.6 Rim lighting only
Front lighting is normally used to lift the exposure level.
It can also be used to soften the harsh shadowing which is sometimes caused by direct sunlight, or a modelling light which is being used to light the rest of the scene. In order to be effective without being obvious, front lighting is very often diffused (soft). Front lighting is usually positioned just above the camera lens axis and fixed to the camera top via the accessory shoe or carrying handle. This light looks straight at the subject from approximately the same point of view as the camera lens, and it is often referred to as the `basher'.
The Paglight was specifically designed for camera top operation and it fulfills this duty extremely well. When lighting an interview in subdued light conditions, or when supplementing poor daylight with a single light source, it is all too easy to over-light the subject with front light. It is important to use the spot and flood facility in combination with the diffuser, to control the light spread and intensity.
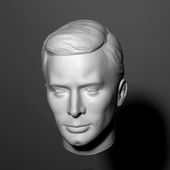
Fig.7 Front light only
The first light to be positioned should be your modelling light.
This will become your key light. As this is the most important light it should be positioned carefully, and this will depend on the scene requirement. Question where the light is supposed to be coming from, and what its source is supposed to be - a window or overhead light? Then decide how much you need to model the features of the subject - the cheekbone, eyebrow, nose, and chin shadows. This should be in sympathy with the subject as well as the story content.
In a standard set-up the modelling light may be used to simulate light coming from a window, so position this light out of shot, forward of the subject and at window height. When the desired modelling effect has been achieved, the soft fill-light can then be added. This should be placed nearer the lens axis on the opposite side to the modelling light in order to soft light the shadowed areas created by the modelling light. Avoid creating further shadows by over-powering the modelling light effect. When using the spot-to-flood facility of the Paglight in combination with the soft light filter you will achieve the fine control required to balance the effect of these two lighting requirements.
Finally, add the rim or backlight. This can be positioned behind the subject, on the darker side, and high enough to rim light the top of the head and shoulders. If required, spill light from this light may be used to light the background. Note that in order to eliminate lens flare, any light falling on the camera lens surfaces, regardless of whether it is out of the framed shot, must be flagged off with either the lamp's own barn door system or a French flag.
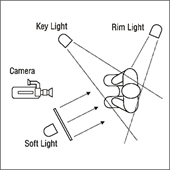
Fig.8 The three light set-up from left.
Fig.9 Modelling and fill light from right.
Fig.10 Modelling light from right and rim light from left.
Using artificial light only, for instance in a studio or room with no windows, is an ideal situation because everything is under your control. In this set-up the camera can be balanced for artificial light and your Paglight can be used with its tungsten-halogen lamp unit without the need for a colour correction filter.
The nominal colour temperature of tungsten halogen studio lighting is 3200°K. The above situation, using the Paglight PowerArc, which produces a daylight colour temperature of 5600°K, would require the orange PowerArc conversion filter,
(Model 9973) to reduce its colour temperature in order to match the artificial lighting.
When using a combination of artificial and natural light, whether the location is exterior or interior, one or other of these light sources must be colour corrected. However, this does not always apply if the artificial light is being emitted at daylight colour temperature. Examples are some studio fluorescent lights, arc lights, and HMI lights, none of which are incandescent lamps. The exception to this rule is that most industrial and domestic fluorescent tubes will require correction or turning off.
If the natural light is strong, and is being used as the key or modelling light, it is important to consider that once filters are added to your artificial lights they may not have enough light output to achieve the desired lighting effect. Also be aware that sunlight is constantly moving, and liable to become masked by buildings, trees or clouds.
You should never attempt to use the camera's white balance to compensate for differing light sources. Fig. 11 shows the result of a set-up that comprises a daylight modelling light, fluorescent ambient light and a halogen fill light. The above lighting can produce a green hue with purple in the shadows and this may not be noticed until the edit stage.
On outside locations most HMI/arc lamps will need little or
no correction, but halogen lamps will need to be filtered with a blue or half-blue, dependent upon the amount of colour correction required; this can vary throughout the day. Imagine that you are shooting a piece to camera (a talking head, as it is often referred to). In a typical exterior set up, if it were a very bright day, you would use the daylight as your modelling light, and your Paglight as a camera-top fill-light. In this situation, you should use the blue Dichroic Filter (Model 9951) in order to raise the colour temperature of the halogen lamp to match daylight.
The sacrifice will be a slight loss of light output, but this is preferable to having a colour mismatch. Alternatively, you can use the Paglight PowerArc (Model 9955), which operates at daylight colour temperature without requiring any colour correction. Using the Diffuser (Model 9952) you would then adjust the beam angle to balance the contrast range between the lit and shadowed areas of the subject.
- Try not to let the fill-light become the predominant
light.
- Fill light should always be soft, so it is advisable
to use
the flip-down diffuser, especially in medium to close-up shot situations.
- For super-soft lighting use the Softlight Diffuser and Filter Kit (Model 9983). This kit works as a stand-alone item, or in conjunction with the Diffuser to give a very flat, super- soft light spread from the larger illumination area. This kit is perfect for medium to tight close-up facial shots.
If you are working inside you can fit gelatine filters to the windows to convert the incoming daylight to artificial light. This would normally be a 204 Full-CT-Orange, a Half 205 or a Quarter 206, dependent on the correction required. Having done this, the view out through the window will look normal to the camera, provided that the light outside does not overpower the lighting within. If this is likely, measure the difference with a standard light meter and chose a Full-CT-Orange 207 with +3 ND or 208 with + 6 ND content, reducing light by 1& 2 stops respectively. Filtering in this way enables standard halogen lamps to be used without filters, effectively increasing their output.
Interestingly, any person working within such a room for a reasonable time would gradually become accustomed to the shift in colour and be unaware of this fact until removing the filter from the window or stepping outside, where for a minute or so everything would appear to have a positively blue tint to it, even white sign boards. You would also observe the effect gradually diminishing as the brain readjusted. This is further proof that the human eye can only detect differences in colour content by direct comparison, and this is the reason why the discerning professional uses a colour meter to aid his work.
In any swift set up, where time is limited, filtering
windows may not be the most practical solution. The only alternative is
to 'blue-up' the tungsten lights with either glass dichroic filters, which
can be placed in the filter frame behind the barndoors, or larger gelatine
filters. Gelatine filters are cheaper than dichroic but must be set out
from the front of any light and away from the heat.
The choice is Full-CT-Blue 201, Half-CT-Blue 202, or a Quarter-CT-Blue
203.
When using your PowerArc in an artificial light
environment you should use the daylight-to-halogen PowerArc Filter (Model
9973). When working closer than two meters from people it is good practice
to use the Diffuser (Model 9952). This can also be used in combination
with all other correction filters including the larger gelatine Softlight
Diffuser & Filter Kit (Model 9983).
Fig.11 The results of setting the white balance to compensate for differing uncorrected light sources.
When first entering a room that is going to be the stage for the next set up you have to assess the situation in a number of ways. Let us take the situation illustrated bellow:
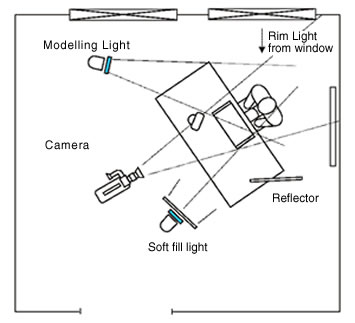 Fig.12
Location set-up
Fig.12
Location set-up - The walls are panelled in dark wood
- There are two medium-sized windows emitting daylight
into the room.
- The scenery outside is not worthwhile including.
- The ceiling is white suspended tiles with embodied
fluorescent down lighters.
- The desk is dark wood with green leather inset and
a white blotter.
- There is a desk top light with an incandescent bulb
and green shade.
- The floor has a fitted dark red carpet.
- There are plenty of power points.
The fluorescent lights in the ceiling should be filtered, but in this situation it might be preferable to turn them off and then, if required, bounce the camera top light off the white ceiling.
The furniture, carpet and wood panelled walls do not reflect light and therefore do not contribute to the reflected lighting effect. However, they do help when recording sound, as you get better quality without the liveliness of an otherwise empty room.
You will note in Fig. 12 that the desk has been set at an angle to the corner of the room. This has not been moved for the shoot; most offices have offset desks to take advantage of the natural daylight, and since we are also taking advantage of the incoming light the desk position is good. With the camera set up as in Fig. 12, the window light will be our key light, around which all others are secondary. Its function is to rim light the shoulders and head of the subject as well as lighting the background wall panelling. There may also be enough light from this window to use a reflector board, if required.
The next step is to set up the modelling light. Its position should be above the head height of the subject, then moved around in this area to achieve the desired modelling effect. Now it is time to soft light the shadows created by the modelling light either with your reflector board or your second stand light, complete with soft-light filter set of course. If the background looks too plain add a planter or a picture. It is quite acceptable to show only part of these so long as their position looks natural in the framed shot.
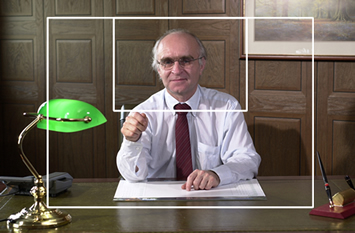
Fig. 13 The finished shot. It is possible to zoom-in on the subject if a shot has been well composed.
The Kit Bag and Useful Accessories
The very nature of location work will have caused you to become a master
of improvisation and adaptation. Many bits and pieces of your kit will
have been assembled as the result of experiences on previous jobs. The
kit bag invariably becomes a topic of conversation on any shoot; it also
represents its owner's experiences and ability to adapt, find, devise,
or even invent. In some cases these gadgets and adaptations have gone
on to become manufactured and marketed as standard production items, while
others were intended to be used for a totally different purpose. I have
seen a wallpaper scraper as part of one kit; this was said to be ideal
for pushing behind architraves in order to attach small fill-lights, or
just to hold cable runs above the doorframe, off the floor and out of
harms way.
Going on location with a few carefully chosen yet seemingly
non-required bits and pieces will prove invaluable, and may ultimately
save the day on one shoot or another. Such things include lighting spigot
adaptors, gaff clamps, French flags and magic arms.
Down at the bottom of the bag you will have a collection of chalk, string,
wire, gaff tape, camera tape, marker pens, bulldog clips, knives, side
cutters, pliers; even an old wire coat hanger, which is a very useful
source of strong wire.
One of the most useful accessories is the reflector
board used for fill light situations. This can be as simple as a piece
of white card or silver foil which has been crumpled, and then flattened
and glued to a piece of card or hardboard. For most purposes the size
only needs to be about 450mm x 600mm. There are, of course, a number of
proprietary makes of reflector boards or materials on the market. There
is one such device that has proved to be quite popular because it twist-folds
down into a very small space.
To open it, you simply pull it from its pouch and shake it. A spring wire
loop, seamed into its radius, unfolds with a whoop! Like magic, you have
a soft silver fabric material stretched across a hoop, two feet in diameter.
The advantage of the reflector material being rigidly suspended or mounted
on a flat surface is that you can easily tip it, in order to aim the light
exactly where you want it.
A fluorescent lamp is a glass tube within which an electrical discharge is maintained through a cocktail of mercury and various inert gases. The bombarding radiation produces excited atoms and these emit photons as they fall back to ground state. A thin layer of phosphor on the inside surface of the glass tube is then caused to fluoresce in the visible light spectrum. The choice of gases determines the colour of light. Most photographic fluorescent lamps are designed to match daylight colour temperature.
An incandescent lamp is a source of light that contains a solid, such as an electrically heated filament. These can range from normal household lamps to photographic tungsten halogen lamps. All incandescent lamps will require some degree of colour correction to match daylight.
The term HMI is a trademark of Osram. They own the various patents. The original inventors are two German scientists: Bernard Kuhl and Werner Block. The "H" represents the chemical symbol for mercury (Hg, Hydrargyrum in Latin). The "M" is Metal Halide from the Rare-Earth Group (Dysprosium, Thulium and Holmium). The "I" refers to the Iodine combined to create the Halogen cycle, a very common "cleaning cycle" in Tungsten incandescent lamps that prevents the Tungsten from the electrodes or filaments from depositing a black residue on the inside walls of the lamp and lowering the output.
Confusion regarding the term HMI arises from the fact that in the beginning the above components were kept as a trade secret and the temporary answer was that "M" represented, not the above, but 'Medium Arc', to define the length of the arc gap in comparison to other discharge lamps in production.
A fluorescent has a long arc gap and a Xenon lamp has a short one. So it all sounded logical and convincing, but as a result we now have a situation where other manufacturers arc lamps are now referred to as HMI.
The closer your light is to the subject, the brighter the illumination will be. The rule is, for a fixed beam angle, when you double the distance the same light is spread over four times the area.
This is known as the Inverse Square Law, and it was for this reason that we designed the Paglight with a spot-to-flood facility.
This gives you the ability to change the beam angle and recover light that may have been lost outside the frame area. Conversely, you can spread the light to reduce the exposure, even when using the Softlight Diffuser Kit. This technique is especially useful when balancing a foreground subject with respect to a surrounding or background scene, and unlike using a dimmer it does not affect colour temperature (see 'Colour Temperature & Dimmers').

An apocryphal story told to me in the early days of my film career explained that the colour temperature of light was originally derived from a boiling crucible of carefully defined metals, heated to such an extent as to emit a light which matched daylight, as observed at mid-day during mid-summer.
The measured temperature at this point was 5600 degrees Kelvin. This was then established as the standard daylight colour temperature. The light emitted from a tungsten halogen lamp would match the light emitted from the crucible of metal when it had cooled to 3200 degrees Kelvin, a domestic tungsten filament lamp would match it at 2700 degrees Kelvin, and so on.
Fig.16 Colour Temperature
When light sources of varying Kelvin temperatures are being used together, they should be colour corrected as required
to conform to a single colour temperature output. In general you will be matching for either daylight at 5600 degrees Kelvin or artificial light at 3200 degrees Kelvin. A range of colour correction filters, are available for this task. A camera balanced for 3200 degrees Kelvin will reproduce images lit by a 5600 degree light source with a blue tint, or conversely a camera balanced for 5600 degrees Kelvin will produce images lit by a 3200 degree light source with an orange tint.
Colour temperature, as defined in a photographic context,
is only concerned with the characteristics of the recording medium, and this is measured according to the ratio of light between the blue and red region of the spectrum. In this respect it differs when applied to physics and colorimetry measurements. Here it refers to the temperature at which a theoretical ideal blackbody radiator would emit light of the same colour (having the same chromaticity) as that of the light being measured, but without melting, boiling or incinerating.
This theoretical model can therefore be extended to cover the electromagnetic spectrum, from radio waves down through the visible spectrum to gamma rays, for analytical and scientific measurement purposes.
Within limits, all electronic cameras have the ability to balance available light to render white as white. A correct balance of all colours in the visible spectrum is required in order to produce white, so it follows that if the camera 'white balance' is correctly set up, all colours recorded under the same lighting conditions will also be correct. Having shots that are correctly colour graded makes viewing the final cut sequence of shots a far more pleasant experience. This also saves a great deal of time at the post-production stage, matching and correcting shots.
 Fig.
17 Primary colours of light
Fig.
17 Primary colours of lightIt is advisable to obtain and keep your own white reference target as not all whites are the same. Some whites contain a touch of blue to make them look whiter to the eye. Just aiming the camera at something in the room that looks white is not a reference to a constant and is most unprofessional. To test this, just gather a number of pieces of paper from around your office that you consider to be white. Now compare them to each other in the light of the office. Note the one you think looks the whitest, then take them into daylight and compare them again. Some camera operators use a white reference card that they refer to as a "warm card"; this white card contains a little blue in order to cheat the camera towards red and thereby produce a warmer image.
On a two-camera shoot it is advisable to use the same white reference target for both cameras.
It is not good practice to "white-balance" a camera in a situation where the illumination is being derived from various sources that differ in colour temperature. An example here would be a mixture of daylight, fluorescent light, and tungsten light, shown in Fig. 18. Remember that light travels in straight lines and although you may have achieved a "white balance" on the white reference target, when you introduce your subject, with all its natural contours, the shadowed areas formed by each light will lack the correct mix of light required to produce the right colour tones in those shadowed areas. Although not visible to the eye, you will notice a green caste and strange pastel tones in the shadows of the image on the screen.
Reflected light from tinted paint on nearby walls can have
an undesirable influence on white balance set ups, so this should be avoided. In such a situation, it is better to balance for the light source only and avoid the mix of reflected light; this will preserve the correct colour balance and skin tones in the lit frame area. The reflected light will also be its correct colour and be perfectly acceptable if its reason for being there appears within the shot.
In the case of theatre lighting, where coloured gels are being used throughout, select one unfiltered light, away from the scene, and use this to set the white balance. The colours will then be represented as the audience sees them.
If a continuous shot between an interior and exterior is required, the interior lighting should be daylight compatible or colour corrected for daylight by using the appropriate blue filters, the camera should then be balanced for daylight, and accordingly the passage between the two will appear as natural to the viewer, as it would to the eye in real life.
The use of a colour temperature meter helps ensure consistent results. It is not easy for the human eye to detect gradual changes in colour temperature because the brain naturally applies a degree of correction. This process does not occur in the same way when viewing a sequence of shots from cameras that have not been set up correctly; confronted by direct comparison, the differences can be most distracting.
Although we often refer to daylight colour temperature being 5600°K as a guide, I am afraid that's all it is. The colour temperature of each day from sunrise to sunset can vary dramatically. Once a camera has been set-up to produce white, it may not continue to do so if the light source has changed during the day. If in doubt, re-white-balance, especially if the camera has been moved to a new location where the lighting may be different.
Fig.18 The result of setting the white balance to compensate for a mix of light sources, including ambient fluorescent light.
Colour temperature exists quite independently of any light output level; unfortunately the two issues do become adversely connected when trying to control the light output of a filament lamp with a dimmer. Dimmers were widely used in the early days of black and white cinematography, but with the advent of colour their use rapidly diminished for all but certain aspects of specialist work in colour cinematography.
It is a fact of physics that the colour temperature of a filament lamp will vary as the voltage applied to it is changed. This can cause problems if you are trying to maintain a correctly balanced shot which also includes a contribution from other lights. In this situation a dimmer would not be appropriate. It is far better to use a light with a spot-to-flood facility, such as the Paglight, in order to control the light output intensity without affecting colour temperature. For greater range, when using your Paglight, just exchange the plug-in lampholder for one with a more appropriate lamp wattage. Plug-in halogen lampholders for the Paglight accept 20W to 100W halogen bi-pin lamps, and wattage label kits are available to aid identification.
Camera top lights which employ dimmers to control the light output level naturally move their colour temperature towards the red end of the spectrum as the output is reduced. This aspect can be used to good effect by giving a warmer look to an otherwise cold image. An improvement can very often be made to medium close-up facial shots by adding a little warmth, and at the same time reduce the problems of glare or whiteout in contrast to the rest of the scene. PAG offers a lamp dimmer facility for the Paglight called VariLux, incorporated into its PowerMax Control Unit (Model No. 9958). PowerMax contains a voltage control circuit which efficiently regulates the voltage at the lamp base to 12V, regardless of battery voltage. This gives a constant and correct colour temperature whilst extending battery run time by as much as 25%, and dramatically improving lamp filament life. Despite some manufacturer's claims to the contrary, changing the voltage on a lamp filament does affect its colour temperature output. This is the last thing you want when you are trying to balance two light sources in a direct comparison situation. Use the spot-to-flood facility to control the light output, or select a more appropriate lamp wattage.
Polarised and unpolarised light exists all around us, yet we do not have the ability to detect the difference between these light waves without employing the aid of a polarising filter. There are clues however: sunlight passing through the earths atmosphere is in the main unpolarised until being reflected at 90° from its direction of travel. This has the effect of polarising some of the light by refraction. Further to this, reflective non-metallic surfaces, such as water or glass, also have the effect of polarising daylight when viewed at about 33° to the surface, whereas shiny metallic surfaces along with soft or matt surfaces such as wood, paper, bricks, all reflect unpolarised daylight. A scene that has a polarised light reflecting from a particular surface can very often be improved by using a polarising filter. The unwanted reflections can be partially or completely eliminated by rotating the filter in front of the lens. The full effect is achieved when the polarising plane of the filter is at 90°to the reflected light's plane of polarisation. The unpolarised light from the rest of the scene passes through the filter. Polarising filters possess a structure composed of long parallel molecules that are aligned in one plane only, and it is this that gives the filter its very special quality. The appearance of a polarising filter resembles that of an ND filter, but it can be used to far greater affect in many other applications.
© PAG Limited 2005